eclipse整合SSM框架(非maven)
(一)前言
- 目前大多ssm整合教程都是基于Maven的,可能对于很多学生而言这并不合适,而且整合思路混乱,配置文件没有分开,使小白很难理解。
- 因此整合了基础的ssm框架,方便大家学习或者快速上手开发
- BaseSSM解决了返回数据中文乱码的问题
项目文末下载
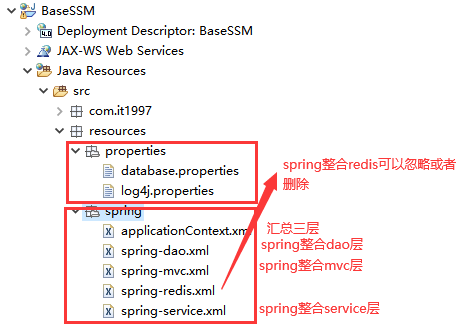
(二)项目结构
- 接下来让我们开一下这个项目的整体结构
(三)创建项目
eclipse新建普通web项目
现在我们正式开始创建项目了。
前期工作:eclipse以及整合好Tomcat了,如果还有不会整个的可以参考eclipse整合Tomcat这篇文章.
新建项目:File-->New-->Dynamic Web Project--> 然后输入你的项目名称-->点击Finish即可创建一个新的web项目

项目结构说明
1.Java Resource目录是存放.java .xml .properties文件的,也就是我们程序源码所在的位置。
2.WebContent 目录是存放静态资源(css/js/html/图片)等文件的,通常是展示给用户的。

导入ssm所需要的的jar包
将ssm所需要的jar包复制到WebContent --> WEB-INF -->lib 目录下
jar包下载链接:https://pan.baidu.com/s/1XgXUNe7dCxzKpiFeylLkMQ 提取码:vw10

项目整合ssm
ssm整合即将spring、spring mvc 、mybatis三个框架建立起一定的联系。
那么巧了,spring就是一个强大的框架,他和其他两个框架可以很好的兼容,当然不止和spring mvc 和mybatis两个框架可以兼容,正如我们所说的ssh框架(spring 、structs、hibernate)spring也可以很好的兼容。
从上述所看,将这个三者建立起联系必然是通过spring框架。我们通过spring 来进行关联spring mvc和mybatis。
一、新建目录结构
我们建立如下的目录的结构,当然这个目录结构也没有硬性的要求,这只能属于编程的规范,而非规定。我们所有开发人员都采用相同的目录结构,那我们在阅读别代码的时候也就相对容易了。

简单说一下,包名的命名规则是域名的反过来写,如我的域名是www.it1997.com 那么我的包名就应该是com.it1997。
二、新建数据库配置文件 database.properties
然后我们在properties目录下新建database.properties文件,用于配置连接数据库的一些参数信息,文件内容如下:
jdbc.driver=com.mysql.jdbc.Driver
jdbc.url=jdbc:mysql://localhost:3306/db_secondhandmarket?useSSL=false&characterEncoding=UTF-8&autoReconnect=true&useUnicode=true
jdbc.username=root
jdbc.password=root
三、新建log4j日志配置文件 log4j.properties
然后我们在properties目录下新建log4j.properties文件,主要用于配置log4j的一些参数信息,文件内容如下:
### 配置根 ###
log4j.rootLogger = debug,console,file

### 设置输出sql的级别,其中logger后面的内 容全部为jar包中所包含的包名 ###
log4j.logger.org.mybatis=console
log4j.logger.java.sql.Connection=DEBUG
log4j.logger.java.sql.Statement=DEBUG
log4j.logger.java.sql.PreparedStatement=DEBUG
log4j.logger.java.sql.ResultSet=DEBUG
### 配置输出到控制台 ###
log4j.appender.console = org.apache.log4j.ConsoleAppender
log4j.appender.console.Target = System.out
log4j.appender.console.Threshold=DEBUG
log4j.appender.console.layout = org.apache.log4j.PatternLayout
log4j.appender.console.layout.ConversionPattern =[%c]-%m%n
### 配置输出到文件 ###
log4j.appender.file= org.apache.log4j.RollingFileAppender
log4j.appender.file.File =E:/Document/IDEA/secondhandmarket/logs/log.log
log4j.appender.file.MaxFileSize=10mb
log4j.appender.file.Threshold = DEBUG
log4j.appender.file.layout = org.apache.log4j.PatternLayout
log4j.appender.file.layout.ConversionPattern =[%p][%d{yy-MM-dd}][%c]%m%n
四、新建 applicationContext.xml
然后我们在spring目录下新建applicationContext.xml文件,applicationContext.xml用于将于spring相关的文件整合起来,然后配置到web.xml中
<?xml version="1.0" encoding="UTF8"?>
<beans xmlns="http://www.springframework.org/schema/beans"
       xmlns:xsi="http://www.w3.org/2001/XMLSchema-instance"
       xmlns:contex="http://www.springframework.org/schema/context"
       xsi:schemaLocation="http://www.springframework.org/schema/beans
        http://www.springframework.org/schema/beans/spring-beans.xsd
        http://www.springframework.org/schema/context
        https://www.springframework.org/schema/context/spring-context.xsd">

    <import resource="classpath:resources/spring/spring-mvc.xml"/>
    <import resource="classpath:resources/spring/spring-dao.xml"/>
    <import resource="classpath:resources/spring/spring-service.xml"/>
    <!-- <import resource="classpath:resources/spring/spring-redis.xml"/> -->
</beans>
五、新建 spring-service.xml
然后我们在spring目录下新建spring-service.xml文件,spring-service.xml文件用于将service层的一些配置信息加入到spring中来管理,例如数据库配置信息,log4j配置信息等。
<?xml version="1.0" encoding="UTF8"?>
<beans xmlns="http://www.springframework.org/schema/beans"
       xmlns:xsi="http://www.w3.org/2001/XMLSchema-instance"
       xmlns:context="http://www.springframework.org/schema/context"
       xmlns:tx="http://www.springframework.org/schema/tx"
       xmlns:aop="http://www.springframework.org/schema/aop"
       xsi:schemaLocation="http://www.springframework.org/schema/beans
    http://www.springframework.org/schema/beans/spring-beans.xsd
    http://www.springframework.org/schema/context
    http://www.springframework.org/schema/context/spring-context.xsd
     http://www.springframework.org/schema/tx
      http://www.springframework.org/schema/tx/spring-tx.xsd
      http://www.springframework.org/schema/aop
      https://www.springframework.org/schema/aop/spring-aop.xsd">
    <!-- 扫描service相关的bean -->
    <context:component-scan base-package="com.it1997.service"/>
    <!--UserServiceImpl注入到IOC容器中-->
    <!-- <bean id="userService" class="com.it1997.service.Impl.UserServiceImpl" >
        <property name="userMapper" ref="userMapper"/>
    </bean> -->
    <!-- 配置声明式事务管理器 -->
    <bean id="transactionManager" class="org.springframework.jdbc.datasource.DataSourceTransactionManager">
        <!-- 注入数据库连接池 -->
        <property name="dataSource" ref="dataSource" />
    </bean>
    <!--结合aop实现事务的注入-->
    <tx:advice id="txAdvice" transaction-manager="transactionManager">
        <tx:attributes>
            <!--给那些方法配置事务 *代表所有-->
            <tx:method name="*" propagation="REQUIRED"/>
        </tx:attributes>
    </tx:advice>
    <!--配置事务切入-->
    <aop:config>
    <aop:pointcut id="txPointCut" expression="execution(* com.it1997.mapper.*.*(..))"/>
    <aop:advisor advice-ref="txAdvice" pointcut-ref="txPointCut"/>
    </aop:config>
</beans>
六、新建 spring-mvc.xml
然后我们在spring目录下新建spring-mvc.xml文件,spring-mvc.xml文件用户整合mvc层相关的信息,例如视图解析器,静态资源等。
<?xml version="1.0" encoding="UTF8"?>
<beans xmlns="http://www.springframework.org/schema/beans"
       xmlns:xsi="http://www.w3.org/2001/XMLSchema-instance"
       xmlns:mvc="http://www.springframework.org/schema/mvc"
       xmlns:contex="http://www.springframework.org/schema/context"
       xsi:schemaLocation="http://www.springframework.org/schema/beans
        http://www.springframework.org/schema/beans/spring-beans.xsd
        http://www.springframework.org/schema/mvc
        https://www.springframework.org/schema/mvc/spring-mvc.xsd
        http://www.springframework.org/schema/context
        https://www.springframework.org/schema/context/spring-context.xsd">
    <!--静态资源过滤-->
    <mvc:default-servlet-handler/>
    <mvc:resources location="/js/"  mapping="/js/**" />
    <mvc:resources location="/css/"  mapping="/css/**" />

    <!--扫描包:controller-->
    <contex:component-scan base-package="com.it1997.controller"/>
    <!--视图解析器-->
    <bean class="org.springframework.web.servlet.view.InternalResourceViewResolver">
        <property name="prefix" value="/WEB-INF/template/"/>
        <property name="suffix" value=".jsp"/>
    </bean>
    <!--解决页面json乱码-->
    <bean id="stringHttpMessageConverter" class="org.springframework.http.converter.StringHttpMessageConverter">
      <constructor-arg value="UTF-8" />
    </bean>
    <!--开启注解驱动  -->
    <mvc:annotation-driven >
        <mvc:message-converters>
        <ref bean="stringHttpMessageConverter" />
        </mvc:message-converters>
    </mvc:annotation-driven>
</beans>
七、新建 spring-dao.xml
然后我们在spring目录下新建spring-dao.xml文件,spring-dao.xml文件主要用于spring 整合dao层相关配置,例如数据库连接池以及mybatis相关的配置。
<?xml version="1.0" encoding="UTF8"?>
<beans xmlns="http://www.springframework.org/schema/beans"
       xmlns:xsi="http://www.w3.org/2001/XMLSchema-instance"
       xmlns:context="http://www.springframework.org/schema/context"
       xsi:schemaLocation="http://www.springframework.org/schema/beans
http://www.springframework.org/schema/beans/spring-beans.xsd
http://www.springframework.org/schema/context
https://www.springframework.org/schema/context/spring-context.xsd">
    <!--spring配置dao层-->
    <!-- 扫描dao相关的bean -->
    <context:component-scan base-package="com.it1997.mapper"/>
    <!-- 配置整合mybatis -->
    <!-- 1.关联数据库文件 -->
    <context:property-placeholder location="classpath:resources/properties/database.properties"/>
    <!-- 2.数据库连接池 -->
    <!--数据库连接池
            dbcp  半自动化操作  不能自动连接
            c3p0  自动化操作(自动的加载配置文件 并且设置到对象里面)
    -->
    <bean id="dataSource" class="com.mchange.v2.c3p0.ComboPooledDataSource">
        <!-- 配置连接池属性 -->
        <property name="driverClass" value="${jdbc.driver}"/>
        <property name="jdbcUrl" value="${jdbc.url}"/>
        <property name="user" value="${jdbc.username}"/>
        <property name="password" value="${jdbc.password}"/>

        <!-- c3p0连接池的私有属性 -->
        <property name="maxPoolSize" value="30"/>
        <property name="minPoolSize" value="10"/>
        <!-- 关闭连接后不自动commit -->
        <property name="autoCommitOnClose" value="false"/>
        <!-- 获取连接超时时间 -->
        <property name="checkoutTimeout" value="100000"/>
        <!-- 当获取连接失败重试次数 -->
        <property name="acquireRetryAttempts" value="2"/>

    </bean>

    <!-- 3.配置SqlSessionFactory对象 -->
    <!-- spring和MyBatis完美整合,不需要mybatis的配置映射文件 -->
    <bean id="sqlSessionFactory" class="org.mybatis.spring.SqlSessionFactoryBean">
        <property name="dataSource" ref="dataSource" />
        <!-- 自动扫描mapping.xml文件 -->
        <property name="mapperLocations" value="classpath:com/it1997/mapper/*.xml"></property>
    </bean>
    <!-- 4.配置扫描Dao接口包,动态实现Dao接口注入到spring容器中 -->
    <!--解释 : https://www.cnblogs.com/jpfss/p/7799806.html-->
    <bean class="org.mybatis.spring.mapper.MapperScannerConfigurer">
        <!-- 注入sqlSessionFactory -->
        <property name="sqlSessionFactoryBeanName" value="sqlSessionFactory"/>
        <!-- 给出需要扫描Dao接口包 -->
        <property name="basePackage" value="com.it1997.mapper"/>
    </bean>
</beans>
八、将applicationContext.xml 配置到web.xml中
很多同学会疑问,我只是建立了几个配置文件而已,那么跟我的项目又有什么关联呢,其实到此确实没有联系,我们需要在WEB-INF目录下的web.xml中配置我们刚才建立的applicationContext.xml文件(applicationContext.xml文件的作用是将三个文件整合到一起)web.xml文件的内容如下:
<?xml version="1.0" encoding="UTF-8"?>
<web-app xmlns="http://xmlns.jcp.org/xml/ns/javaee"
         xmlns:xsi="http://www.w3.org/2001/XMLSchema-instance"
         xsi:schemaLocation="http://xmlns.jcp.org/xml/ns/javaee http://xmlns.jcp.org/xml/ns/javaee/web-app_4_0.xsd"
         version="4.0">
    <servlet>
        <servlet-name>springmvc</servlet-name>
        <servlet-class>org.springframework.web.servlet.DispatcherServlet</servlet-class>
        <init-param>
            <param-name>contextConfigLocation</param-name>
            <param-value>classpath:resources/spring/applicationContext.xml</param-value>
        </init-param>
        <load-on-startup>1</load-on-startup>
    </servlet>
    <servlet-mapping>
        <servlet-name>springmvc</servlet-name>
        <url-pattern>/</url-pattern>
    </servlet-mapping>

    <!--乱码过滤-->
    <filter>
        <filter-name>encodingfilter</filter-name>
        <filter-class>org.springframework.web.filter.CharacterEncodingFilter</filter-class>
        <init-param>
            <param-name>encoding</param-name>
            <param-value>utf-8</param-value>
        </init-param>
    </filter>
    <filter-mapping>
        <filter-name>encodingfilter</filter-name>
        <url-pattern>/*</url-pattern>
    </filter-mapping>
    <!--session-->
    <session-config>
        <session-timeout>15</session-timeout>
    </session-config>
    <welcome-file-list>
        <welcome-file>/index.jsp</welcome-file>
    </welcome-file-list>
</web-app>
到此整合ssm框架已经完成,配置文件中重要的地方已经写了注释,如果还有不明白的就评论区留言。
(四)测试
测试代码在最后的项目中,大家可以下载下来参考哦!!!
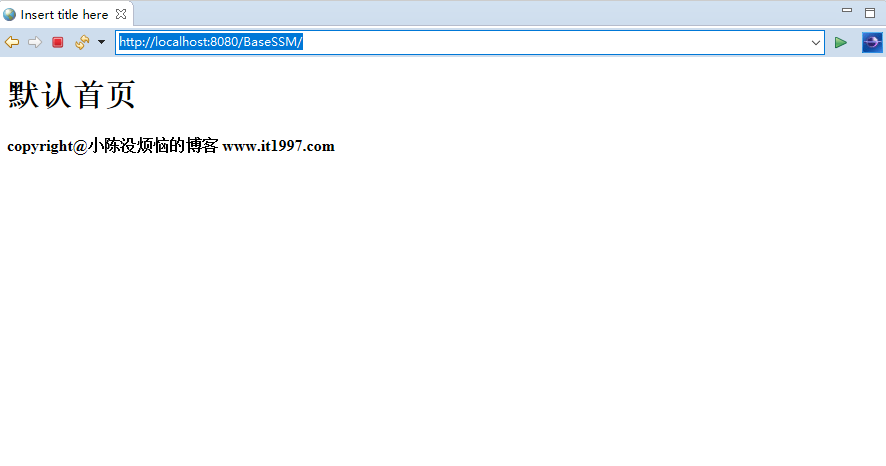
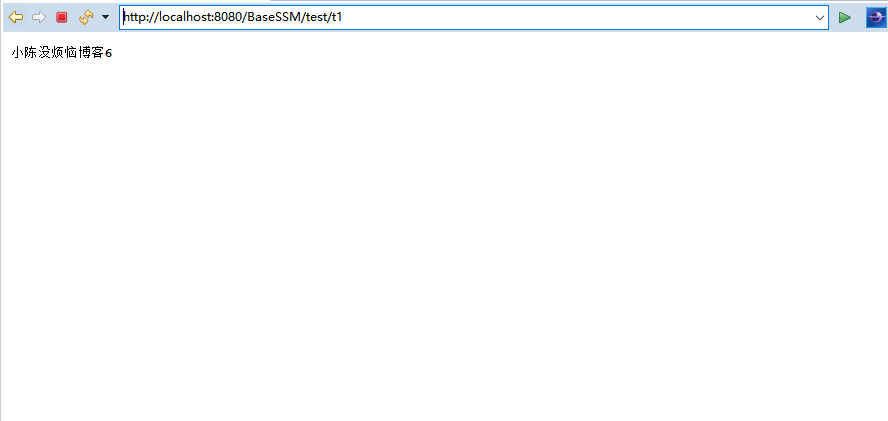
(五)运行结果
配置了默认首页
测试可以查询数据库
测试可以返回页面
测试可以返回json
(六)下载链接
链接:https://pan.baidu.com/s/176Xz_SuFi2Af_CKliqYO2g 提取码:sx1o
您的点赞,就是对我最大的支持!!!
- 本文标签: Java
- 本文链接: https://www.it1997.com/article/20
- 版权声明: 本文由小陈没烦恼原创发布,转载请遵循《署名-非商业性使用-相同方式共享 4.0 国际 (CC BY-NC-SA 4.0)》许可协议授权
相关文章
热门推荐


近期评论
-
来自: 好用的截图工具FastStone Capture 带激活码)

-
来自: 留言板
-
来自: 留言板

-
来自: 留言板

-
来自: 留言板